Now that we have a working environment(From my previous post), our next task is to set up our Eclipse IDE. For the versions of Eclipse that I have used(Ganymede, Galileo, Helios), the procedure has been roughly the same, except for the odd button or menu name. This set up assumes a direct connection to the internet exists.
First, extract eclipse to your desired location. After extracting, run the eclipse executable. It will prompt for you to select a workspace:

Specify your desired workspace, or you can leave it at default. Once finished, you can click 'Ok' which will bring you to the eclipse dashboard. You may explore the buttons here, but I'd go straight to the Eclipse 'Workbench'.
The first thing you might want to do is to check if your eclipse is configured to use the correct JDK. On the menu bar, go to Window -> Preferences. Type 'Installed JRE' in the 'type filter text' box. Click the resulting option, and you should see something similar to below:

Here you can check if eclipse is using the correct JRE(though it really is a JDK) - in this case, it's set to my JDK installation. You may edit the location of an installed JRE by selecting the JRE from the menu and click 'Edit', to browse to your preferred JRE.
Once this has been set up, we can now download and install the plugins.
Back to the menu bar, select Help -> 'Install new software', then on the resulting window select 'Add' which can be found next to the 'Work with' drop-down menu.

The beauty of eclipse is that you can customize it to suit your requirements by installing plugins. The very basic set up I use includes the following plugins:
m2eclipse:http://m2eclipse.sonatype.org/sites/m2e
springIDE:http://springide.org/updatesite
To install an eclipse plugin, we have to add the 'updatesite' to eclipse. Copy the address of the update site of the plugin you wish to install, then paste it in the 'Location' field, then give that update site a name:

Once added, it will display the features and tools you can install:

Check the core plugin and any additional features you'd like installed, then click next. Eclipse will check if any dependencies are missing, then prompt you to accept the user license, after which it will download and install the plugins. During installation you may have to accept certificates. Usually it will prompt you to restart eclipse after installing finishes.
Once installation finishes and eclipse restarts, let us try and create our first, obligatory 'Hello World' application.
Select 'File -> New -> Java Project' to open the New Java Project wizard.
Name your project 'HelloWorld'. Default settings should suffice for now, then click 'Finish'.

Eclipse will then create a new Project in your package explorer:

Right-click the 'src' package, then select 'New -> Package' then Name the new package 'helloworld.app'. This creates a new 'package', or 'folder', to organise your Java classes.
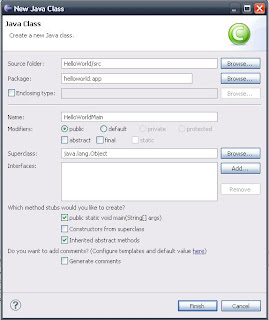
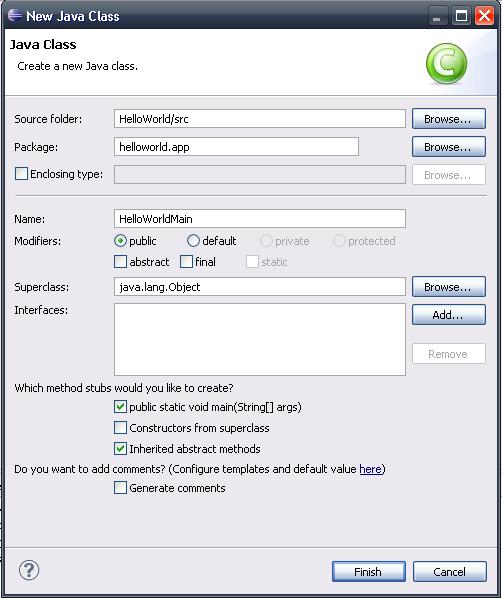
Right-click the new package, then select 'New -> Class'. Name your new class HelloWorldMain, then under the 'Which method stubs would you like to create' check the 'public static void main(String[] args)' box. Leave the other settings at default, then click 'Finish':
Eclipse will then generate a base class file for you to edit and develop.
Next, let us add the code that will print 'Hello World!' to your output console. Inside the main() method, type:
Your final code should look something like this:

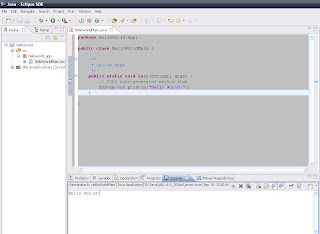
To run and see if it works, right click the HelloWorldMain.java file in your Package Explorer, then select 'Run As -> Java Application'. If all goes well, if you check your Console(Usually, by default, found at the bottom of the eclipse window), it will show 'Hello World!':
Congratulations! You have just wrote a Java program using Eclipse!
In future posts I will put down more tutorials, hints and new things I've learned and discovered using Spring, Maven, and any other new stuff I stumble upon.
Thanks, 'til next time!
First, extract eclipse to your desired location. After extracting, run the eclipse executable. It will prompt for you to select a workspace:

Specify your desired workspace, or you can leave it at default. Once finished, you can click 'Ok' which will bring you to the eclipse dashboard. You may explore the buttons here, but I'd go straight to the Eclipse 'Workbench'.
The first thing you might want to do is to check if your eclipse is configured to use the correct JDK. On the menu bar, go to Window -> Preferences. Type 'Installed JRE' in the 'type filter text' box. Click the resulting option, and you should see something similar to below:

Here you can check if eclipse is using the correct JRE(though it really is a JDK) - in this case, it's set to my JDK installation. You may edit the location of an installed JRE by selecting the JRE from the menu and click 'Edit', to browse to your preferred JRE.
Once this has been set up, we can now download and install the plugins.
Back to the menu bar, select Help -> 'Install new software', then on the resulting window select 'Add' which can be found next to the 'Work with' drop-down menu.

The beauty of eclipse is that you can customize it to suit your requirements by installing plugins. The very basic set up I use includes the following plugins:
m2eclipse:http://m2eclipse.sonatype.org/sites/m2e
springIDE:http://springide.org/updatesite
To install an eclipse plugin, we have to add the 'updatesite' to eclipse. Copy the address of the update site of the plugin you wish to install, then paste it in the 'Location' field, then give that update site a name:

Once added, it will display the features and tools you can install:

Check the core plugin and any additional features you'd like installed, then click next. Eclipse will check if any dependencies are missing, then prompt you to accept the user license, after which it will download and install the plugins. During installation you may have to accept certificates. Usually it will prompt you to restart eclipse after installing finishes.
Once installation finishes and eclipse restarts, let us try and create our first, obligatory 'Hello World' application.
Select 'File -> New -> Java Project' to open the New Java Project wizard.
Name your project 'HelloWorld'. Default settings should suffice for now, then click 'Finish'.

Eclipse will then create a new Project in your package explorer:

Right-click the 'src' package, then select 'New -> Package' then Name the new package 'helloworld.app'. This creates a new 'package', or 'folder', to organise your Java classes.
Right-click the new package, then select 'New -> Class'. Name your new class HelloWorldMain, then under the 'Which method stubs would you like to create' check the 'public static void main(String[] args)' box. Leave the other settings at default, then click 'Finish':
Eclipse will then generate a base class file for you to edit and develop.
Next, let us add the code that will print 'Hello World!' to your output console. Inside the main() method, type:
System.out.println("Hello World!");Your final code should look something like this:

To run and see if it works, right click the HelloWorldMain.java file in your Package Explorer, then select 'Run As -> Java Application'. If all goes well, if you check your Console(Usually, by default, found at the bottom of the eclipse window), it will show 'Hello World!':

Congratulations! You have just wrote a Java program using Eclipse!
In future posts I will put down more tutorials, hints and new things I've learned and discovered using Spring, Maven, and any other new stuff I stumble upon.
Thanks, 'til next time!

